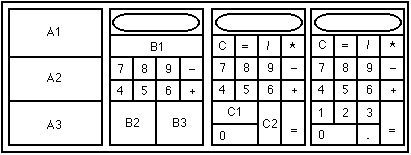
Consider this picture. First a calculator is broken up into a grid of one column and three rows. Put a panel in each of those cells. Panel A1 will contain the text field and the top four keys. Panel A2 will contain the middle two rows of keys, and panel A3 will contain the bottom two rows of keys.
The eight keys in the middle panel A2 are all the same size.
Therefore you can use a GridLayout with two rows and four columns
in it. However this isn't true for A1 and A3, so let's continue.
Split panel A1 into a grid of two rows and one column. The top cell
will be used for the display. However the bottom cell
still needs to be split into four pieces so add Panel B1. The
bottom is more complex still. Split it into a grid of one row and
two columns and put panels B2 and B3 there.

Panel B1 contains four keys, all the same size so put a grid of one row and four columns there, and add those keys. Next split Panel B2 into two rows and one column. Put the oversized zero key in the second cell and Panel C1 in the first. Next split B3 into two columns and one row. Put a panel in the first cell and the oversized equals key in the second.
Finally split C1 into two columns and one row and put the one and two keys there. Then split C2 into two rows and one column for the three and decimal point keys.